Creating a Digital Product
In audienced, you can create and manage digital products in two ways:
- via the + Create button (quick start),
- directly through the side menu (full control).
Both methods are equally valid and complement each other.
Quick creation via the + Create button
In the top right corner of the admin dashboard, there is a + Create button.
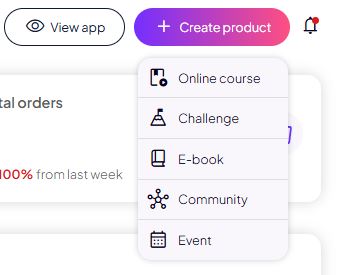
In the top right corner of the admin dashboard, click + Create and choose the product type:
- Online course
- Challenge
- E-book
- Community
- Event
This method is ideal when you want to:
- quickly add a new product,
- start with a basic structure,
- be guided step by step.
Each product type has its own structure and purpose, so it is important to choose the right one.
Managing via the side menu (main workspace)
Most work in audienced happens through the side menu, which is always available on the left side of the dashboard.
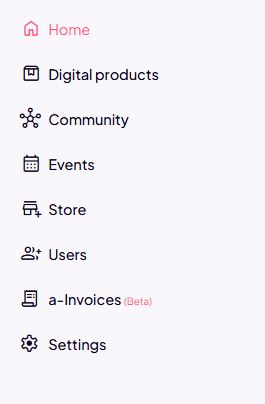
Side menu overview
In the side menu, you can access all key parts of the platform. For creating digital products, the important areas are:
Digital products
The main workspace for working with products.
Here you can:
- create new products,
- edit existing courses, challenges, or e-books,
- add modules, lessons, and content,
- manage access and structure.
This is the central place for managing content.
Community
- create and edit communities,
- add spaces (e.g. introduction, questions),
- manage posts,
- link the community to products.
Events
- create live or online events,
- set the date, time, and link,
- enable adding to Google Calendar,
- link events to products or a community.
How creation and editing connect
Important:
- + Create → quick entry into a new product,
- Side menu → long-term management and editing.
Most users:
- create a product via + Create,
- then do all further work through Digital products in the side menu.
Summary
- you can create digital products via the + Create button or the side menu,
- the side menu is the main workspace for managing the platform,
- here you manage products, communities, events, users, and settings,
- everything is accessible in one place, without switching between tools.
Creating an online course
If you choose Online course, you can create one of three course types.
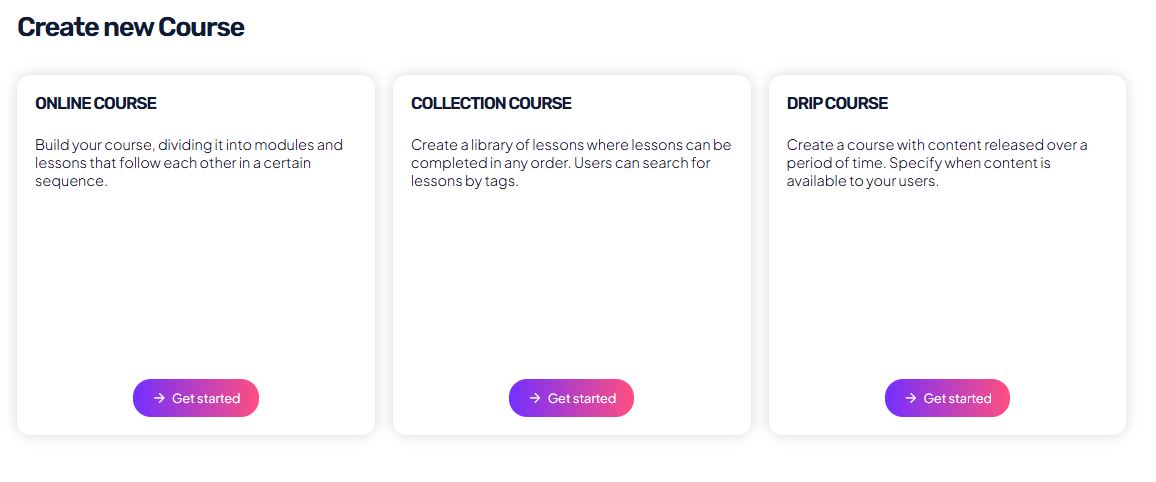
1. Online course
Suitable for:
- structured programs,
- step-by-step learning,
- a clear content sequence.
Features:
- content is divided into modules and lessons,
- users follow a defined sequence,
- ideal for classic online courses.
2. Collection course
Suitable for:
- a content library,
- independent exploration of knowledge.
Features:
- lessons are not tied to a sequence,
- users can search content by tags,
- suitable for knowledge bases or content archives.
3. Drip course
Suitable for:
- gradual content release,
- mentorships, challenges, or longer programs.
Features:
- lessons unlock at a specific time,
- users do not get access to everything immediately,
- the pace is set by the admin.
What happens after you choose a product type
After you choose a product type:
- enter the basic details (name, description),
- add content (lessons, videos, written materials),
- optionally link a community,
- set the access and sales method.
Other types of digital products
In addition to online courses, you can also create:
- Challenge – a time-limited program with daily or weekly tasks,
- E-book – digital content without a lesson structure,
- Community – a standalone space for members,
- Event – a live or online event with a date and time.
Each type has a tailored user interface and experience for end users.
Important to know
- you can create a product even if payments are not set up yet,
- one account can include multiple different products,
- you can edit, expand, or link products together later.
Summary
- create a digital product via the + Create button,
- choose the product type based on your goal,
- for courses, choose the right structure (online, content library, drip),
- build your content gradually,
- sales and payment settings come later.
This article covers the basics of creating a digital product in audienced.
To understand each type of digital product and how to create it, see the other articles under Digital products.